Imagine vibrant bursts of red cascading from a hanging basket, a miniature tomato vineyard right outside your door. Growing cherry tomatoes in a hanging basket isn't just a charming aesthetic choice; it's a surprisingly practical way to enjoy fresh, homegrown goodness, even if you're short on space. It's easier than you might think, and the rewards are delicious! Growing Cherry Tomatoes in Hanging Baskets: A Complete Guide Growing cherry tomatoes in hanging baskets offers a delightful way to bring fresh produce to even the smallest spaces. Whether you have a sprawling garden or a tiny balcony, the vibrant foliage and sweet, juicy fruits of cherry tomatoes add beauty and flavor to your surroundings. This guide will walk you through every step, from choosing the right basket to harvesting your bountiful crop. Consider these tips your keys to unlocking a cascade of delicious cherry tomatoes right at your fingertips! Why Choose Hanging Baskets fo...
Dreaming of juicy, sun-ripened tomatoes straight from your garden? The secret to a bountiful harvest often starts long before the last frost, right inside your home. Learning to start tomato seedlings indoors is easier than you might think, and it's incredibly rewarding. Let's get growing!
Why Start Tomato Seedlings Indoors?
Starting tomato seedlings indoors offers several compelling advantages that contribute to a more successful and productive tomato-growing season. By taking control of the early stages of growth, you can:
Extend the Growing Season
One of the most significant benefits of starting tomato seeds indoors is the ability toextend the growing season. Tomatoes thrive in warm weather, and many regions experience a limited window of frost-free days. By starting seeds indoors 6-8 weeks before the last expected frost, you give your tomato plants a head start. This allows them to mature and produce fruit earlier in the season, maximizing your harvest. Without this head start, in some climates, the tomato plants may not have enough time to fully mature and produce a substantial yield before the first frost of fall. In essence, it's a race against time, and starting indoors provides a crucial advantage.
Gain Control Over the Environment
When you start tomato seedlings indoors, you have complete control over theenvironmental conditions they experience. This includes temperature, light, and moisture. You can ensure that your seedlings receive the optimal amount of warmth and light for healthy growth, which can be difficult to achieve outdoors, especially during unpredictable spring weather. Indoor environments also protect seedlings from pests and diseases that can devastate young plants. A controlled environment minimizes stress on the seedlings, leading to stronger, more resilient plants that are better equipped to thrive once transplanted outdoors.
Furthermore, the ability to regulate humidity is vital. High humidity can lead to fungal diseases, while low humidity can dry out seedlings. Maintaining a consistent level of moisture in the soil and air is crucial for preventing problems and promoting robust growth. This level of control is simply not possible when direct sowing outdoors.
Select Specific Tomato Varieties
Starting from seed allows you to choose from a muchwider range of tomato varieties than you might find at your local garden center. Garden centers typically stock a limited selection of popular or readily available tomato plants. However, when you start from seed, you can explore a vast array of heirloom, hybrid, and specialty varieties, each with its unique flavor, size, and appearance. This allows you to tailor your tomato crop to your specific preferences and gardening goals.
For example, you might want to try growing a rare heirloom tomato like 'Brandywine' for its exceptional flavor, or a disease-resistant hybrid like 'Early Girl' for its reliable performance. You can experiment with different colors, shapes, and sizes, creating a diverse and exciting tomato garden. Starting from seed opens up a world of possibilities, allowing you to discover new favorites and expand your gardening horizons.
Cost-Effectiveness
Starting tomato seedlings from seed is generally morecost-effective than purchasing transplants from a garden center. A packet of tomato seeds typically contains dozens or even hundreds of seeds, and the cost per seed is significantly lower than the price of a single tomato plant. While there is an initial investment in seed starting supplies, such as seed trays, potting mix, and grow lights, these materials can be reused for multiple seasons, further reducing the overall cost. For example, a single packet of 50 'Roma' tomato seeds might cost $3, while a single 'Roma' tomato transplant could cost $5 or more. Over time, the savings can add up significantly, especially if you grow a large number of tomato plants.
This allows you to invest in other gardening essentials or simply save money while still enjoying a bountiful harvest. Starting from seed is a particularly attractive option for gardeners on a budget or those who want to grow a large number of tomato plants.
Materials You'll Need To Start Tomato Seedlings Indoors
Before you dive in, gather these essential supplies for starting tomato seedlings indoors:
- Tomato Seeds: Choose your favorite varieties! Consider disease resistance and days to maturity for your climate.
- Seed Starting Trays or Containers: Cell packs, peat pots, or even recycled yogurt cups work well. Ensure they have drainage holes.
- Seed Starting Mix: Use a lightweight, sterile mix specifically designed for seedlings. Avoid garden soil, which can be too heavy and harbor diseases.
- Watering Can or Spray Bottle: Gentle watering is key to avoid disturbing the delicate seedlings.
- Heat Mat (Optional): Provides bottom heat to speed up germination.
- Grow Lights: Essential for providing adequate light, especially in areas with limited sunlight. Fluorescent or LED grow lights are good options.
- Timer (Optional): For automatically turning the grow lights on and off.
- Labels and Marker: To keep track of different tomato varieties.
Having the right equipment can make all the difference in the success of your indoor tomato seedling operation. Getting organized and having everything ready to go will ensure that the process runs smoothly, making it easier to produce strong and healthy tomato plants.
Step-by-Step Guide: Starting Tomato Seedlings Indoors
Follow these simple steps for successful tomato seedling starts:
Sowing the Seeds
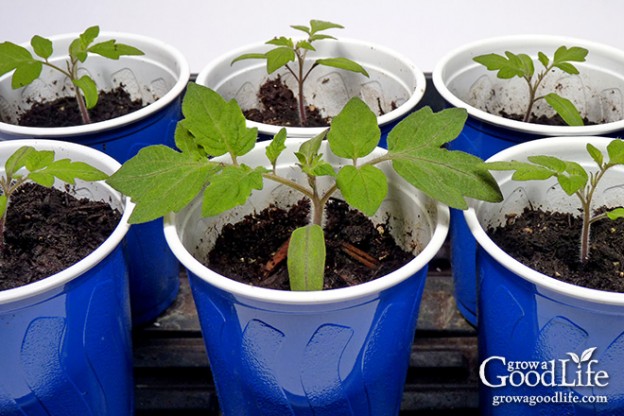
Fill your seed starting trays or containers with seed starting mix. Moisten the mix thoroughly, but don't saturate it. Gently press the mix down to eliminate air pockets. Sow tomato seeds about ¼ inch deep, placing 2-3 seeds per cell or container. Cover the seeds with a thin layer of seed starting mix. Lightly water the surface with a spray bottle. Label each container with the tomato variety and date sown. This is a critical step to keep track of what you’re growing.
Creating the Ideal Germination Environment
Place the seed trays in a warm location, ideally between 70-80°F (21-27°C). A heat mat can be used to provide bottom heat and speed up germination. Cover the trays with a humidity dome or plastic wrap to maintain moisture. Check the soil moisture daily and mist with water as needed to keep the mix moist. Germination typically occurs within 5-10 days. Once seedlings emerge, remove the humidity dome or plastic wrap and place the trays under grow lights. For optimal growth, position the lights a few inches above the seedlings and keep them on for 14-16 hours per day. This consistent light is crucial for preventing leggy growth.
Thinning Seedlings
Once the seedlings have developed their first true leaves (the second set of leaves to appear), it's time to thin them. Select the strongest seedling in each cell or container and carefully snip off the others at the soil line with small scissors. Avoid pulling them out, as this can disturb the roots of the remaining seedling. Thinning ensures that the remaining seedling has adequate space, light, and nutrients to thrive. This step is often difficult for beginners, but it’s essential for producing robust tomato plants.
Watering and Fertilizing
Water the seedlings regularly, keeping the soil consistently moist but not waterlogged. Allow the top inch of soil to dry out slightly between waterings. Use a gentle watering can or spray bottle to avoid disturbing the seedlings. Once the seedlings have developed their second set of true leaves, begin fertilizing them with a diluted liquid fertilizer specifically formulated for seedlings. Follow the instructions on the fertilizer label for proper dilution rates. Fertilizing provides essential nutrients for healthy growth. Regular, light feeding is better than infrequent, heavy applications.
Hardening Off Seedlings
Before transplanting your tomato seedlings outdoors, it's crucial to harden them off. Hardening off gradually acclimates the seedlings to outdoor conditions, reducing the risk of transplant shock. Begin by placing the seedlings outdoors in a sheltered location for a few hours each day, gradually increasing the amount of time they spend outdoors. Protect them from direct sunlight, wind, and frost. After about a week, the seedlings should be able to tolerate full sun and outdoor conditions. This process typically takes 7-10 days and is vital for successful transplanting. Skipping this step can result in stunted growth or even death of the seedlings.
Transplanting Tomato Seedlings Outdoors
Once the danger of frost has passed and the soil has warmed up, it's time to transplant your tomato seedlings outdoors. Choose a sunny location with well-drained soil. Dig holes that are slightly larger than the root ball of the seedlings. Gently remove the seedlings from their containers, taking care not to damage the roots. Plant the seedlings deep, burying the stem up to the first set of leaves. This encourages the development of additional roots along the buried stem, resulting in a stronger, more resilient plant. Space the seedlings according to the recommended spacing for the variety you are growing. Water the seedlings thoroughly after transplanting.
Troubleshooting Common Problems when Starting Tomato Seedlings Indoors
Even with the best planning, you might encounter a few common problems when starting tomato seedlings indoors. Here's how to address them:
- Leggy Seedlings: This occurs when seedlings don't receive enough light, causing them to stretch and become weak. Increase the light intensity by moving the grow lights closer to the seedlings or providing more hours of light.
- Damping Off: This fungal disease causes seedlings to collapse and die. Prevent damping off by using a sterile seed starting mix, providing good air circulation, and avoiding overwatering.
- Yellowing Leaves: This can be caused by nutrient deficiencies or overwatering. Ensure the seedlings are receiving adequate fertilizer and avoid allowing the soil to become waterlogged.
- Pests: Aphids and other pests can sometimes infest indoor seedlings. Inspect the seedlings regularly and treat any infestations with insecticidal soap or neem oil.
By staying vigilant and addressing problems promptly, you can ensure that your tomato seedlings remain healthy and thrive.
Looking to keep your garden well-watered once your tomato plants are thriving outdoors? Consider using a reliable and durablegarden hose, like this heavy-duty 75 FT Garden Hose with a 10-Function Nozzle. Its leak-proof metal connectors and kink-free design make watering your tomato plants a breeze! You can get it here: https://amzn.to/3Yv E0Bo.