Imagine vibrant bursts of red cascading from a hanging basket, a miniature tomato vineyard right outside your door. Growing cherry tomatoes in a hanging basket isn't just a charming aesthetic choice; it's a surprisingly practical way to enjoy fresh, homegrown goodness, even if you're short on space. It's easier than you might think, and the rewards are delicious! Growing Cherry Tomatoes in Hanging Baskets: A Complete Guide Growing cherry tomatoes in hanging baskets offers a delightful way to bring fresh produce to even the smallest spaces. Whether you have a sprawling garden or a tiny balcony, the vibrant foliage and sweet, juicy fruits of cherry tomatoes add beauty and flavor to your surroundings. This guide will walk you through every step, from choosing the right basket to harvesting your bountiful crop. Consider these tips your keys to unlocking a cascade of delicious cherry tomatoes right at your fingertips! Why Choose Hanging Baskets fo...
There's nothing quite like biting into a juicy, sun-ripened tomato that you've grown yourself. But before you can enjoy that delicious moment, you've got to start those seeds! Don't worry, it's easier than you might think. This guide will walk you through everything you need to know about starting tomato seeds indoors, so you can have a thriving garden full of flavorful tomatoes.
Why Start Tomato Seeds Indoors?
Starting tomato seeds indoors gives you a significant head start on the growing season. Tomato plants are warm-weather lovers, and starting them indoors allows you to nurture them in a controlled environment until the weather outside is suitable for transplanting. Here’s why it’s beneficial:
- Long Growing Season: Tomatoes require a long growing season, often longer than what's available in many regions. Starting seeds indoors extends that season, allowing for earlier harvests.
- Protection from the Elements: Young seedlings are vulnerable to frost, pests, and harsh weather conditions. Indoor starting provides protection during their delicate early stages.
- Control Over Environment: You can precisely control the temperature, humidity, and light levels, optimizing germination and seedling growth.
- More Variety: Starting from seed gives you access to a wider variety of tomato types than what's typically available as starts in garden centers.
When to Start Your Tomato Seeds
Timing is crucial when starting tomato seeds. The goal is to have strong, healthy seedlings ready to transplant outdoors after the last expected frost. As a general rule, you should start your tomato seeds indoors 6-8 weeks before the last expected frost date in your area. Here's how to determine the optimal time:
- Find Your Last Frost Date: Consult your local weather service or agricultural extension office for the average last frost date in your region.
- Count Backwards: Subtract 6-8 weeks from that date. This will give you the ideal time to start your tomato seeds.
- Consider Variety: Some tomato varieties mature faster than others. Check the seed packet for specific recommendations.
Example: If your last frost date is May 15th, you should aim to start your tomato seeds indoors around March 27th to April 1st.
Gathering Your Supplies: What You'll Need
Having the right supplies makes the process of starting tomato seeds much smoother. Here’s a checklist of essential items:
- Tomato Seeds: Choose high-quality seeds from a reputable source. Consider the varieties you want to grow based on your taste preferences, growing conditions, and desired use (e.g., slicing, sauce, cherry).
- Seed Starting Tray or Containers: You can use seed starting trays with individual cells, small pots, or even recycled containers like yogurt cups. Make sure they have drainage holes.
- Seed Starting Mix: Use a sterile, soilless seed starting mix. This type of mix is lightweight, well-draining, and free from disease pathogens. Avoid using garden soil, as it can be too heavy and may contain harmful organisms.
- Watering Can or Spray Bottle: For gentle watering without disturbing the seeds.
- Heat Mat (Optional but Recommended): Tomato seeds germinate best at warm temperatures (70-80°F). A heat mat placed under the seed starting tray provides consistent warmth.
- Grow Lights (Optional but Recommended): Seedlings need ample light to grow strong and healthy. Grow lights provide supplemental light, especially during the shorter days of early spring.
- Labels and Marker: To keep track of the different tomato varieties you're growing.
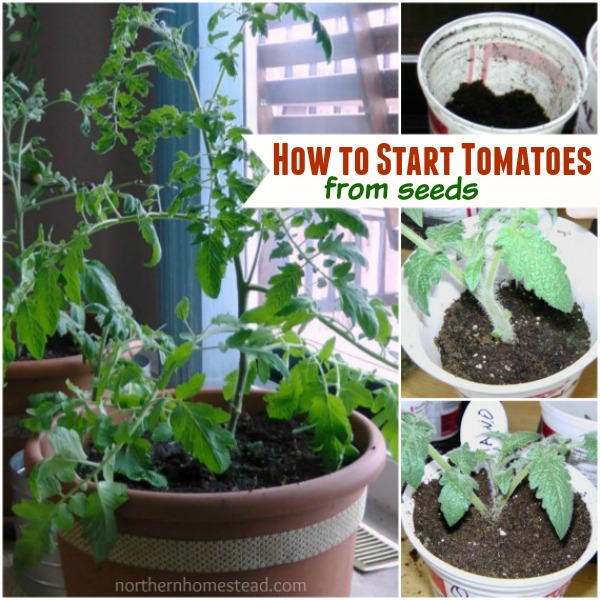
Step-by-Step Guide: How to Start Tomato Seeds
Now, let's get to the fun part: starting those tomato seeds! Follow these steps for a successful start:
Step 1: Prepare Your Containers
Fill your seed starting tray or containers with seed starting mix. Gently tap the containers to settle the mix and remove any air pockets. Moisten the mix thoroughly with water, allowing excess water to drain. The mix should be damp, not soggy.
Step 2: Sow the Seeds
Make a small indentation (about ¼ inch deep) in the center of each cell or container. Place 2-3 tomato seeds in each indentation. This increases the chances of at least one seed germinating. Cover the seeds lightly with seed starting mix and gently pat down.
Step 3: Provide Warmth and Moisture
Place the seed starting tray on a heat mat, if using. Cover the tray with a clear plastic dome or plastic wrap to create a humid environment. This helps retain moisture and promotes germination. Place the tray in a warm location (70-80°F) out of direct sunlight.
Step 4: Monitor Germination
Check the tray daily for moisture. If the mix is drying out, gently mist it with water. Germination typically occurs within 5-10 days. Once the seeds germinate, remove the plastic dome or wrap to allow for air circulation. This helps prevent fungal diseases.
Step 5: Provide Light
Once the seedlings emerge, move the tray under grow lights or to a sunny window. If using grow lights, position them a few inches above the seedlings and adjust the height as the seedlings grow. Provide 14-16 hours of light per day. If using a sunny window, rotate the tray regularly to ensure even light exposure. The goal is to prevent leggy growth. Leggy growth happens when seedlings don't get enough light and they stretch towards the light source, resulting in weak stems.
Step 6: Thin the Seedlings
Once the seedlings have developed their first set of true leaves (the second set of leaves that appear after the initial seed leaves, also known as cotyledons), thin them to one seedling per cell or container. Choose the strongest, healthiest-looking seedling and carefully snip off the others at the soil line using scissors or small pruning shears. Avoid pulling them out, as this can disturb the roots of the remaining seedling.
Step 7: Water and Fertilize
Water the seedlings regularly, allowing the soil to dry out slightly between waterings. Avoid overwatering, as this can lead to root rot. Once the seedlings have developed their second set of true leaves, begin fertilizing them with a diluted liquid fertilizer formulated for seedlings. Follow the instructions on the fertilizer package.
Hardening Off Your Tomato Seedlings
Before transplanting your tomato seedlings outdoors, it's crucial to "harden them off." This process gradually acclimates the seedlings to outdoor conditions, reducing the shock of transplanting. Here’s how to do it:
- One Week Before Transplanting: Begin by placing the seedlings outdoors in a sheltered location (e.g., a porch or patio) for a few hours each day.
- Gradually Increase Exposure: Over the next week, gradually increase the amount of time the seedlings spend outdoors, as well as their exposure to direct sunlight and wind.
- Protect from Frost: If there's a risk of frost, bring the seedlings indoors or cover them with a frost blanket.
Hardening off is critical to ensure that your young tomato starts have the best chance to flourish in your garden.
Transplanting Your Tomato Seedlings
Once the danger of frost has passed and the soil has warmed up, it's time to transplant your tomato seedlings into the garden. Choose a sunny location with well-drained soil. Prepare the planting holes by amending the soil with compost or other organic matter. Plant the seedlings deeper than they were growing in their containers, burying the stem up to the first set of leaves. This encourages the formation of new roots along the buried stem, resulting in stronger, healthier plants. Water the newly transplanted seedlings thoroughly.
Starting your own tomato plants from seed is a rewarding experience that allows you to grow a wider variety of delicious tomatoes. Don't forget to check out theUpgraded Seed Starter Tray with Grow Lights and Heat Mat to give your seedlings the best possible start. This comprehensive kit includes everything you need to create the perfect environment for germination and early growth. It includes a handy 3-in-1 Soil Meter and Sticky Gnat Traps, and 40-Cell Seed Growing Tray, for Germination & Plant Propagation Station, which are great for getting things going. You can find it on Amazon here: https://amzn.to/3Sjp Saz.