Imagine vibrant bursts of red cascading from a hanging basket, a miniature tomato vineyard right outside your door. Growing cherry tomatoes in a hanging basket isn't just a charming aesthetic choice; it's a surprisingly practical way to enjoy fresh, homegrown goodness, even if you're short on space. It's easier than you might think, and the rewards are delicious! Growing Cherry Tomatoes in Hanging Baskets: A Complete Guide Growing cherry tomatoes in hanging baskets offers a delightful way to bring fresh produce to even the smallest spaces. Whether you have a sprawling garden or a tiny balcony, the vibrant foliage and sweet, juicy fruits of cherry tomatoes add beauty and flavor to your surroundings. This guide will walk you through every step, from choosing the right basket to harvesting your bountiful crop. Consider these tips your keys to unlocking a cascade of delicious cherry tomatoes right at your fingertips! Why Choose Hanging Baskets fo...
There's nothing quite like the taste of a sun-ripened tomato, fresh from your own garden. But getting those juicy beauties starts long before the warm weather arrives. That's right, we're talking about starting your tomato seeds indoors. Don't let the idea intimidate you! It's a rewarding process, and with a little know-how, you can be well on your way to a bountiful tomato harvest.
Why Start Tomato Seedlings Indoors?
Starting tomato seedlings indoors gives you a huge head start on the growing season, especially in regions with shorter summers. By the time the last frost has passed and the soil is warm enough, your tomato plants will already be strong, healthy, and ready to take off. This translates into earlier and often larger yields. Let's dive into the benefits.
- Extended Growing Season: Get a jump start on the season, allowing your plants to mature and produce fruit earlier than if you directly sowed them in the garden.
- Control Over Environment: Indoor growing allows you to control factors like temperature, light, and moisture, creating the ideal conditions for germination and early growth. This greatly improves your success rate.
- Stronger, Healthier Plants: Starting indoors allows you to nurture your seedlings through their most vulnerable stage, protecting them from pests, diseases, and harsh weather conditions.
- Wider Variety Selection: Starting indoors allows you to grow unique tomato varieties that might not be readily available as transplants at local nurseries.
When to Start Your Tomato Seeds Indoors
Timing is everything when it comes to starting tomato seeds indoors. The general rule of thumb is to sow your seeds 6-8 weeks before the last expected frost date in your area. To determine your last frost date, consult your local weather service, agricultural extension office, or reputable online resources. For example, if your last frost date is typically around May 15th, you should aim to start your seeds indoors around late March to early April.
Calculating the Right Time
It's always better to start a little late than too early. If your tomato plants get too big before you can transplant them, they can become leggy and stressed. Use a calendar and count backwards from your last frost date to determine the ideal sowing window. Keep in mind that different tomato varieties may have slightly different maturity times, so consider this as well when planning.
Gathering Your Supplies for Starting Tomato Seedlings Indoors
Before you begin, you'll need to gather the necessary supplies. Having everything on hand will make the process much smoother and more enjoyable. Here's a comprehensive list of what you'll need:
- Tomato Seeds: Choose high-quality seeds from a reputable source. Consider different varieties based on your taste preferences, growing conditions, and desired uses (e.g., slicing, sauce, cherry tomatoes).
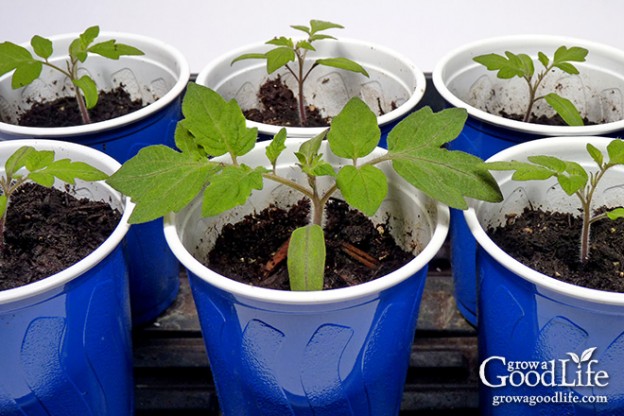
- Seed Starting Trays or Pots: Use trays with individual cells or small pots (2-3 inches in diameter) with drainage holes. Peat pots, coir pots, and plastic trays are all suitable options.
- Seed Starting Mix: Use a lightweight, sterile seed starting mix, not garden soil. This mix is specifically formulated to provide good drainage and aeration for delicate seedlings.
- Watering Can or Spray Bottle: Use a gentle watering can or spray bottle to avoid disturbing the seeds and seedlings.
- Heat Mat (Optional): A heat mat can significantly improve germination rates, especially in cooler environments.
- Grow Lights (Recommended): Provide supplemental light to your seedlings, especially if you don't have a sunny windowsill. Fluorescent grow lights or LED grow lights are good options.
- Labels and a Permanent Marker: Label each tray or pot with the tomato variety and the date of sowing.
- Spray Bottle: A clean spray bottle for misting.
The Step-by-Step Guide to Starting Tomato Seeds Indoors
Now that you have your supplies ready, let's get down to the nitty-gritty of starting your tomato seeds indoors. Follow these steps for best results:
- Prepare Your Containers: Fill your seed starting trays or pots with seed starting mix, leaving about half an inch of space at the top. Gently tap the containers to settle the mix.
- Sow the Seeds: Make a small indentation (about ¼ inch deep) in the center of each cell or pot. Place 2-3 tomato seeds in each indentation. This increases the chances of at least one seed germinating.
- Cover the Seeds: Gently cover the seeds with seed starting mix and lightly water the surface with a spray bottle.
- Provide Warmth: Place the trays or pots on a heat mat (if using) and cover them with a clear plastic dome or plastic wrap to create a humid environment.
- Maintain Moisture: Keep the seed starting mix consistently moist, but not soggy. Check the moisture level daily and water as needed.
- Provide Light: Once the seeds germinate (usually within 5-10 days), remove the plastic dome or plastic wrap and place the seedlings under grow lights. If using a windowsill, choose a south-facing window that receives at least 6 hours of direct sunlight per day.
- Thin the Seedlings: Once the seedlings have their first true leaves (the second set of leaves that appear after the cotyledons), thin them to one plant per cell or pot. Choose the strongest, healthiest-looking seedling and carefully snip off the others at the soil line.
- Fertilize Regularly: Begin feeding your seedlings with a diluted liquid fertilizer (follow the instructions on the fertilizer label) about once a week.
- Harden Off the Seedlings: About a week before transplanting your tomato plants outdoors, you'll need to "harden them off." This process gradually acclimates the seedlings to outdoor conditions. Start by placing them outside in a sheltered location for a few hours each day, gradually increasing the amount of time they spend outdoors. Protect them from direct sunlight, wind, and frost.
Troubleshooting Common Issues When Starting Tomato Seeds Indoors
Even with the best of intentions, you may encounter some challenges when starting tomato seeds indoors. Here are some common problems and how to address them:
- Poor Germination:
- Cause: Old or poor-quality seeds, improper soil temperature, or insufficient moisture.
- Solution: Use fresh seeds from a reputable source, maintain a soil temperature of 70-80°F (21-27°C), and ensure consistent moisture.
- Leggy Seedlings:
- Cause: Insufficient light.
- Solution: Provide adequate light by using grow lights or placing the seedlings in a sunny south-facing window. You can also bury the stems deeper when transplanting to encourage root development.
- Damping Off:
- Cause: A fungal disease that attacks seedlings, causing them to wilt and die.
- Solution: Use sterile seed starting mix, avoid overwatering, and provide good ventilation. If damping off occurs, remove the affected seedlings immediately and treat the remaining plants with a fungicide.
- Yellowing Leaves:
- Cause: Nutrient deficiency.
- Solution: Fertilize regularly with a diluted liquid fertilizer.
Transplanting Your Tomato Seedlings Outdoors
Once the danger of frost has passed and the soil has warmed up, it's time to transplant your tomato seedlings into the garden. Choose a sunny location that receives at least 6-8 hours of direct sunlight per day. Prepare the soil by adding compost or other organic matter to improve drainage and fertility. Dig holes that are slightly larger than the root balls of your seedlings. Gently remove the seedlings from their containers and plant them in the holes, burying the stems up to the first set of leaves. This will encourage the development of a stronger root system. Water the plants thoroughly and mulch around them to help retain moisture and suppress weeds.
Final Thoughts on Starting Tomato Seedlings Indoors
Starting tomato seedlings indoors is a rewarding and cost-effective way to get a head start on your tomato harvest. With a little planning, preparation, and attention to detail, you can grow strong, healthy tomato plants that will provide you with an abundance of delicious, homegrown tomatoes all season long. So, grab your seeds, gather your supplies, and get ready to enjoy the fruits (or vegetables!) of your labor.